Instructions
Preparation for Use
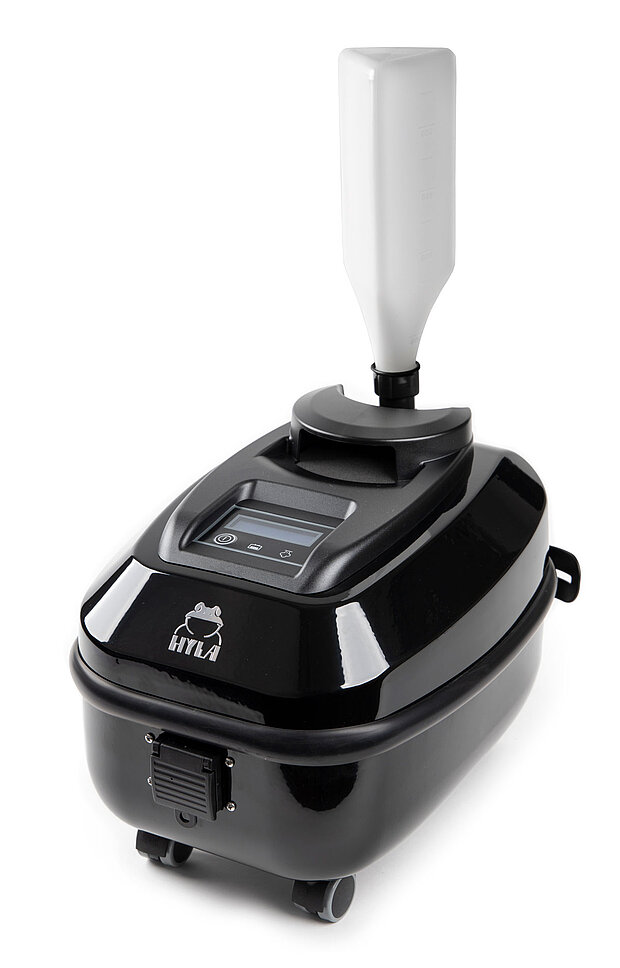
Filling with Water
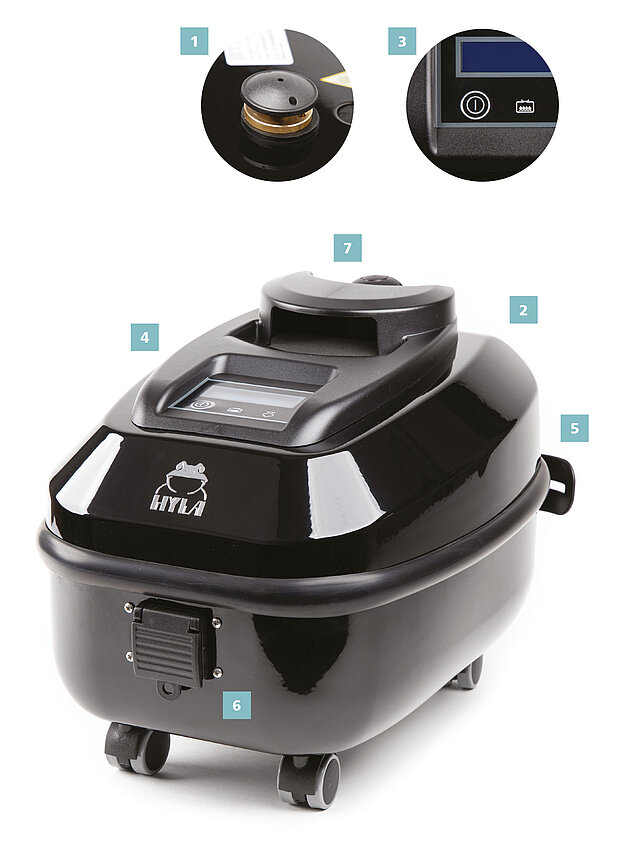
Before connecting the appliance to power supply make sure that the boiler cap (1) is fully tightened.
Fill the tank (2) with 2 filling bottles of tap water.
Press the on/off switch (3).
The appliance will now pump the water into the boiler.
The appliance is equipped with a warning sound signal that indicates when cold water must be poured into the tank (2).
Water level: when water level is low, H2O sign will appear on the display (4).
In case of low water level, steam output is interrupted so that the boiler under pressure is off and not idle.
To add water, remove tank cap (7) and fill up the tank (2) using the plastic bottle up to the indicated level.
Never pour detergents, anti-scale additives, essences or distilled water into the tank (2)! Doing so will result in serious damage to the water circulation system and the heating element.
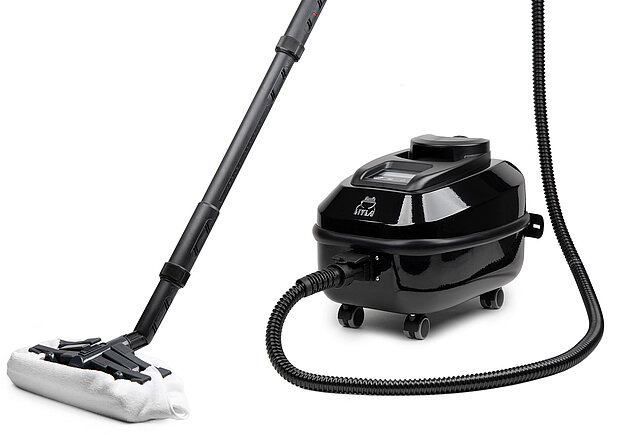
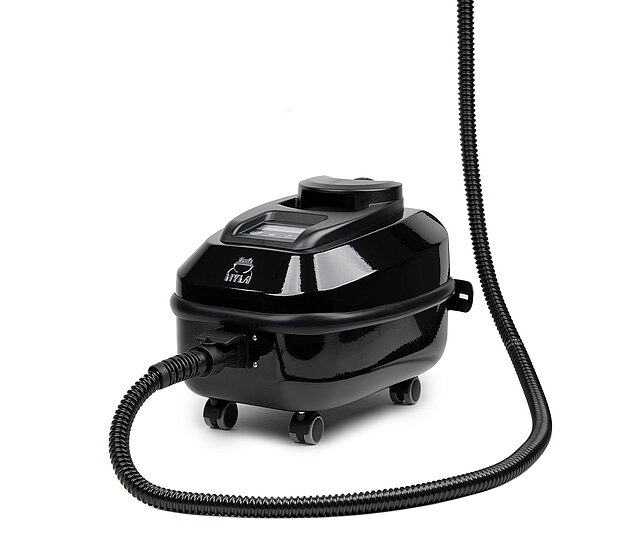
Inserting the steam hose
Lift the protective cover of the contact outlet (6). Now you can insert the plug of the steam hose into the outlet.
To remove the steam hose, lift the protective cover of the contact outlet (6) and pull out the hose.
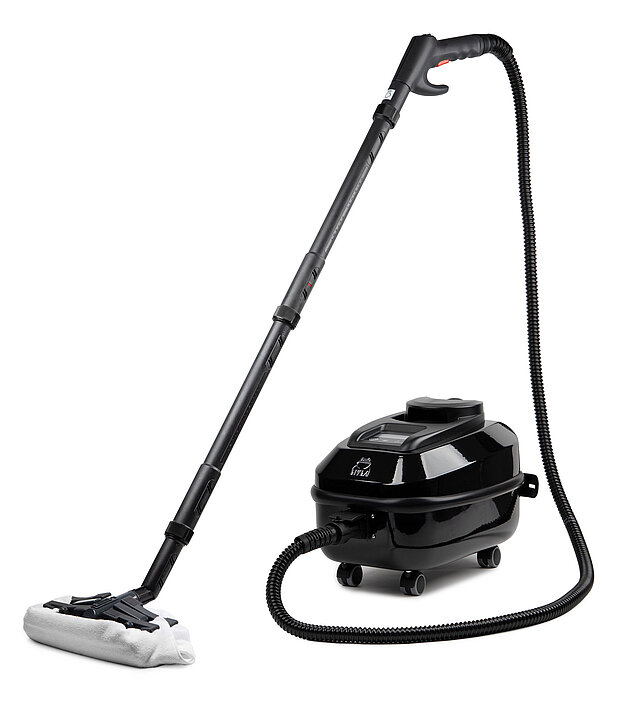
Connection Of Accessories
First, turn the locking ring on hose or pipe in counter clockwise direction to its limit, then insert the appropriate accessory into hose or pipe and rotate the locking ring in clockwise direction until you hear a click.
To remove the accessories, rotate the locking ring in counter clockwise direction and pull out the accessory.
Display and Initial Operation
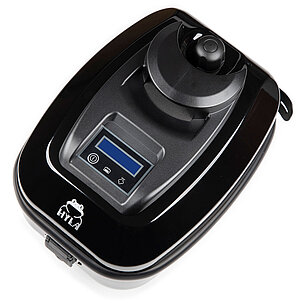
Display
Display panel with on/off switch.
Turn on the appliance by pressing the on/off switch (3). The appliance will now pump water into the boiler.
The appliance needs about 3–5 minutes to convert the water into dry steam. The display will indicate when water reaches the operating temperature (170°C) and pressure (8 bar). The appliance is now ready to use.
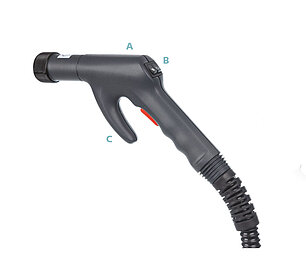
Activation of cleaning with hot water (A). You can choose the steam level by pressing button (B). NO STEAM, STEAM1, STEAM2, STEAM3.
Initial operation
The appliance must be filled with water.
Now activate the on/off switch (3). Boiler sign will appear on the display, indicating the appliance is ready for use (4).
Connect the steam hose.
The appliance has a three-tier steam control.
You can regulate the steam level by pressing button (B). NO STEAM, STEAM1, STEAM2, STEAM3.
You can activate and deactivate the steam jet by pressing button (C).
Your appliance except dry steam function also has hot water under high pressure function. To activate this function, press and hold button (A). Use the hot water function with STEAM2 or STEAM3 steam position.
Hot water function helps to remove dissolved impurities. Especially the guide rails of showers and oveflow of sinks and basins. This function is also applicable for cleaning garden furniture, etc.
Note that this function is only intended for short-time work.
The hoses leading into the unit and the steam hose are cold; therefore, you need to release the condensation from the hoses by releasing steam at full power for 10 seconds. Please wait until the temperature reaches again about 170 °C (340 °F).
After you have finished the cleaning, switch off the appliance using the on/off switch (3).
Unplug the appliance and wind the cord in its position (5).
Before storing the appliance, allow it to reach room temperature (approx. 30 minutes).
Removing Scale Deposits In The Steam Generator
Descaling is a necessary process to ensure long life of the appliance. The procedure can be done at home if the instructions below are followed. In case of any doubts, please contact your authorized service centre.
Depending on the hardness of the tap water, the machine must be cleaned of limestone deposits every 4 to 6 months.
Proceed as follows:
- Unplug the appliance from the power supply.
- Wait for the unit to cool down.
- Unscrew boiler cap (1) by using the included boiler key; pour the water out of the boiler.
- Close the boiler again using the boiler key. Make sure the cap is in locked position.
- Remove the tank cap and pour the water out of the water tank.
- For descaling dissolve 25 g of descaling powder in 800 ml (one filling bottle) water and pour into water tank (use descaling powder provided by our service; descaling powder not included).
- Turn on the appliance and wait approximately one minute until the fluid has been pumped into the boiler.
- Add another filling bottle of water into the water tank.
- Heat the appliance and wait for the steam indicator light to come on, before connecting the steam hose.
- Activate the steam jet a few times on every steam level (1, 2 and 3) to remove scale deposits in every single valve.
- Turn off the appliance and disconnect from the electrical power supply.
- After the appliance has cooled down completely, reopen the boiler using the boiler key (15) and pour out the water.
- Close the boiler again by using the key. Make sure the cap is in locked position before use.
- Never use chemicals for normal operation or descaling.
- Routine checks of the appliance and accessories at our authorized service centre will significantly prolong your appliance’s lifetime.
This user guide cannot contain all the possibilities for use. For more information, do not hesitate to contact your consultant.